
Showing posts with label DIY. Show all posts
Showing posts with label DIY. Show all posts
Thursday, May 10, 2012
FREE Invitation Printables
Getting married soon... want some great invitations for a GREAT price? How does FREE sound?! Well your dreams have been answered. On the blog iDiY they have a TON of free invitation printables! Go here to see all the designs that have!! Go take a look and see what goodies you find!!


Wednesday, April 11, 2012
How to Pick the Right and Good Paintbrush
So I getting to the end of my bathroom renovation, so you know what that means PAINTING!! I saw this post on a blog called Today's Nest and just had to share it because I was literally in Lowe's last night trying to figure out what paintbrushes I needed to complete this project the quickest and most efficiently. Be sure to check out this blog because they have a TON of great posts!!
OK... so you have your paint color or stain and you walk over to the massive amount of paint brushes AND rollers available... do you just look and stare OR do you get caught up in all the great accessories that they have for painting. Corner pads, edge trimmers, paint pads, trim rollers... and the list can go on. Like I said I get caught up. I have a bag of materials I have to take back today because I got caught up last night.
But really after you've chosen the
right stain or paint, how do you choose the right tools for the job...
and does it even matter? Of course it does!
Anatomy of a brush

Handle – most importantly, choose one that fits well in your hand. Made of wood or plastic. Common types are:
or tin.
Bristles – where all the magic happens. The butt end of the bristles are held together in an epoxy setting inside the ferrule. The tip end holds and delivers the paint.
Plug – this handy part is nestled within the bristles to divide them and act as a reservoir for the liquid. It is typically made of wood or cardboard. Better brushes will have smaller, thinner ones.
Keepers – that plastic sleeve the brush is in. Hold on to it to store your brush after each use. It is perfectly sized and fits over the handle, too.
In the Bristles
Flagged (or split) ends on bristles allow them to better hold and spread paint. The result is more even painting with fewer brush strokes on the painted surface. A good quality brush will have a high percentage of flagged bristles.
Except those intended for precision painting, higher quality brushes will also have bristles of varying length.
Bristles of good quality brushes are tapered. Tapering allows the bristles to hold more paint.
Some common types are:
Types of brushes
Wall brush – use this one on walls, floors, and ceilings. Generally found in 3 to 5 inch versions, pick the one that suits you best.
Angle sash brush – use this one for more precise painting such as trim, sashes, and sills. It is perfect for cutting in corners. These most commonly come between 1 to 3 ½ inch varieties. 2 ½ inch seems to be favored by many painters.
Flat sash brush – use this one for wide trim and sashes. You will find this in a few sizes, but 3 inch is a good starting place.
More to consider
You don’t necessarily have to buy the most expensive brush, but choose a good quality one that will last for many paint projects to come.
Avoid those brushes with bristles secured by glue. Look for epoxy settings.
Dipping your brush just halfway up the bristles is sufficient to load it with paint. If you dip it all the way to the ferrule you can cause damage, and at the very least, a clean-up nightmare.
To release excess paint, gently tap both flat sides of the brush on the inside of the paint can.
Break the habit of dragging the side along the inside of the can. This removes much of the paint that you just loaded.
Maintenance and care
Clean brushes immediately to avoid hardening.
Use a metal comb on wet bristles.
Clean oil based paints from brushes with solvent. Use water and mild detergent to clean latex based paints.
Keep brushes in the plastic sleeve (keepers) in which they were purchased. If you don’t have that any longer wrap brushes (with bristles flat) in aluminum foil.
Always store flat or suspended by the hole in the handle to keep bristles straight.
Soaking brushes in water can cause irreparable damage to the filament and/or epoxy setting and could cause the ferrule to rust.
Need to take a break? Keep a supply of plastic wrap around to cover your brushes and keep them from drying out.
And all those other accessories... they definitely help, but the good old paintbrush does the trick every time!!


- Beaver tail short handle – 2 inches long. It is good for maneuvering in tight, narrow places.
- Beaver tail handle – usually 4 inches long. It is the standard size for most projects.
- Sash handle – 6 ½ inches long. It is good for extra control when painting as it is easier to turn.
or tin.
Bristles – where all the magic happens. The butt end of the bristles are held together in an epoxy setting inside the ferrule. The tip end holds and delivers the paint.
Plug – this handy part is nestled within the bristles to divide them and act as a reservoir for the liquid. It is typically made of wood or cardboard. Better brushes will have smaller, thinner ones.
Keepers – that plastic sleeve the brush is in. Hold on to it to store your brush after each use. It is perfectly sized and fits over the handle, too.
In the Bristles
Flagged (or split) ends on bristles allow them to better hold and spread paint. The result is more even painting with fewer brush strokes on the painted surface. A good quality brush will have a high percentage of flagged bristles.
Except those intended for precision painting, higher quality brushes will also have bristles of varying length.
Bristles of good quality brushes are tapered. Tapering allows the bristles to hold more paint.
Some common types are:
- Natural hog bristles – best for oil-based paints. Don’t bother to use these bristles with anything other than oil-based paints. The naturalness of them makes them prone to holding water which ends badly.
- Nylon bristles – used for latex paints.
- Polyester – can be used for all paints with relative success.
Types of brushes
Wall brush – use this one on walls, floors, and ceilings. Generally found in 3 to 5 inch versions, pick the one that suits you best.
Angle sash brush – use this one for more precise painting such as trim, sashes, and sills. It is perfect for cutting in corners. These most commonly come between 1 to 3 ½ inch varieties. 2 ½ inch seems to be favored by many painters.
Flat sash brush – use this one for wide trim and sashes. You will find this in a few sizes, but 3 inch is a good starting place.
More to consider
You don’t necessarily have to buy the most expensive brush, but choose a good quality one that will last for many paint projects to come.
Avoid those brushes with bristles secured by glue. Look for epoxy settings.
Dipping your brush just halfway up the bristles is sufficient to load it with paint. If you dip it all the way to the ferrule you can cause damage, and at the very least, a clean-up nightmare.
To release excess paint, gently tap both flat sides of the brush on the inside of the paint can.
Break the habit of dragging the side along the inside of the can. This removes much of the paint that you just loaded.
Maintenance and care
Clean brushes immediately to avoid hardening.
Use a metal comb on wet bristles.
Clean oil based paints from brushes with solvent. Use water and mild detergent to clean latex based paints.
Keep brushes in the plastic sleeve (keepers) in which they were purchased. If you don’t have that any longer wrap brushes (with bristles flat) in aluminum foil.
Always store flat or suspended by the hole in the handle to keep bristles straight.
Soaking brushes in water can cause irreparable damage to the filament and/or epoxy setting and could cause the ferrule to rust.
Need to take a break? Keep a supply of plastic wrap around to cover your brushes and keep them from drying out.
And all those other accessories... they definitely help, but the good old paintbrush does the trick every time!!

Sunday, April 8, 2012
How To Die Clear Glasses
Saw this idea on PINTEREST and knew that I would probably be doing this for the glasses I use in my bathroom, which is currently undergoing renovations!! Go take a look at the blog Craft Berry Bush and this was where I got the idea from.
Now let the FUN begin!
The jars I am using I got from Old Time Pottery in Surfside Beach, SC. If you have an Old Time Pottery go check out the store as they have a TON of items at GREAT times. My jars ranged from $1.49-$3.99.
You will need:
~ Clear Jar
~ Mode Podge or White Elmers' GLue
~ Paint Brush
~ Food Coloring
~ And last but not least PATIENCE


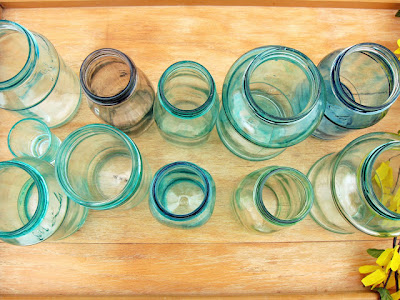
Now let the FUN begin!
The jars I am using I got from Old Time Pottery in Surfside Beach, SC. If you have an Old Time Pottery go check out the store as they have a TON of items at GREAT times. My jars ranged from $1.49-$3.99.
You will need:
~ Clear Jar
~ Mode Podge or White Elmers' GLue
~ Paint Brush
~ Food Coloring
~ And last but not least PATIENCE

Now let's begin... Mix 1 tsp of glue, 3 drops of food coloring and 1.5 tsp
of water. You might want to try different ratios and see what you
prefer though. Obviously the more food colouring the darker the jar will be. In
order to make a turquoise shade you will need two drops of blue and 1
drop of green.

In a small bowl, place the glue, food colouring and water. And mix together with a brush.

This amount is sufficient to cover three jars if you are using the brushing method.
Turn your jar upside down and using even strokes, brush onto the jar from bottom to top, being careful not to go over it too much or the glue will start to clump together. The streaks you see when the mixture is wet will ALMOST be invisible if done correctly. And this is where the patience comes in.
Be sure to seal the jar with a sealant, so that if you do use the jar as a vase all of your hard work will not come off!!
And now you have beautiful jars to display around your home. Me I am going to use mine in the bathroom!! I have ordered a TON of items of off Etsy... bath bombs, body scrubs, bath balls that fizz, bath salts. Yes I am getting a little over the top with having girly things in the bathroom and can't wait to see the products in the jars.
Be sure to share your pictures with me, so that I can show them on my blog! I would LOVE to see how they come out.

Thursday, April 5, 2012
Easter Inspiration
With Easter this Sunday... thought I would share some inspiration pictures of what you could do for Easter decorations.!! ENJOY & HAVE A GREAT THURSDAY! One more day until the weekend.
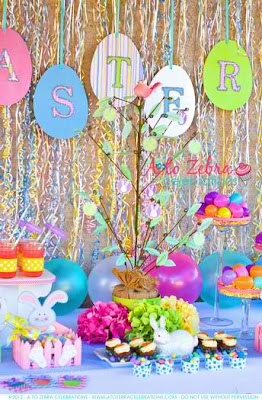


The banner can be made by cutting ovals out of cardstock paper and then pasting on pre-formed letters. Have fun with decorating the eggs. And when Easter is over, just store for next year!!

Paper Pom Poms are EVERYWHERE!! Be sure to check out my earlier post on how to make these. They look great everywhere and are quick and inexpensive way to liven up a space. Want to create that backdrop? 1. Get 2 foam boards and tape them together. 2. Get some fabric you like and enough to cover the two boards. 3. Using fabric adhesive... spray onto board and lay fabric on top. 4. Pull fabric until smooth and secure on the back. Quick and easy!! Just be light on that spray adhesive. I learned this the hard way!!

More poms AND see those blue tinted glasses on the way... I will be putting up a post on how to make this lovely creation tomorrow, so be on the lookout!!
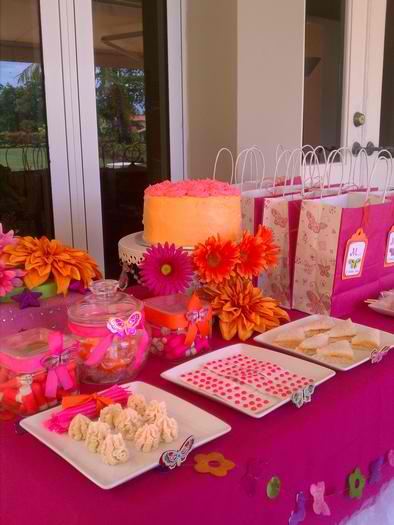
Orange and Pink anyone... these colors sure make a statement!! I love this color combination. See the jars on the left side of the photo... you can get these at the Dollar Store. Just decorate with some ribbon and there you go!! When creating and organizing make the Dollar Store one of your first stops! They have some of the best DIY and storage solutions!! Just get a can of spray and that's all you need!


Baby's Breath Bunny Wreath = LOVE!!

Buy a case of water and make the labels at home on your home computer. Will be putting up a template for water bottle labels next week!!

Peeps on a stick... Easter wouldn't be Easter without peeps!!

Monday, March 26, 2012
Bathroom Renovation - Part 1
Happy Monday All:
Sorry I have been absent these past few days. I am in the middle of a MAJOR bathroom renovation! Yeah and Boo... Plus and Minus!! There are so many ups and downs ALREADY to this project. The yeah... I get a new bathroom... the boo... I have to knock out a WHOLE bathroom! This reno consisted of a FULL GUT JOB!! So guess who thought she was going to have fun with a sledge hammer... ME! Fun... not at all! My house was built in 1964 and things just weren't built the same as they are in today's time. They were built to withstand everything and I think they just mixed stuff up to make thin-set. Because that thin-set wasn't so thin!! It was actually over an 1 inch thick... then it had wire behind that. Oh yeah remember there is a tile you have to bust as well. The kicker the WHOLE bathroom is tiled!! I thought it was only going to take 2-3 hours to demo the bathroom... WRONG... can you say 12 hours... yes you read that right 12 HOURS!! 12 hours of blood, sweat, and tears. Yes there was some blood, a lot of sweat, and I had a melt down when I got done with the bathroom this morning because my body... mostly my hands hurt so bad. And on top of that I got had about 6 hours of sleep in 2 days. So not really my prettiness moment.
Doing this demolition thought me a lot though. Withstanding pain and pushing through when all of really want to is quit... is really just mind over matter. This morning when I was staring at the floor that I needed to bust out... I really just wanted to call it quits. I had to take a few breaths, say a prayer and just go in! I took each area that I got done as an accomplishment and made small goals for myself. The prize for completing the goal... a break for lifting the sledge hammer! And when I was finally done at 6 am... all I could do was say THANK YOU... I MADE IT... AND I FINISHED!!
But let me just say I will NEVER bust out a bathroom that was built before 1980's and never had a reno before. Naw not going to do it!! If its after the 80's... I'm all in and I will take on any room that is mostly sheetrock.
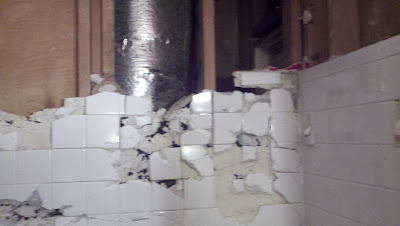
So here are some pics of the before and during pics and will post some more during and after pics and let you know how this journey goes. I can already tell you cleanup doesn't look like its going to be much fun either!!


Doing this demolition thought me a lot though. Withstanding pain and pushing through when all of really want to is quit... is really just mind over matter. This morning when I was staring at the floor that I needed to bust out... I really just wanted to call it quits. I had to take a few breaths, say a prayer and just go in! I took each area that I got done as an accomplishment and made small goals for myself. The prize for completing the goal... a break for lifting the sledge hammer! And when I was finally done at 6 am... all I could do was say THANK YOU... I MADE IT... AND I FINISHED!!
But let me just say I will NEVER bust out a bathroom that was built before 1980's and never had a reno before. Naw not going to do it!! If its after the 80's... I'm all in and I will take on any room that is mostly sheetrock.
So here are some pics of the before and during pics and will post some more during and after pics and let you know how this journey goes. I can already tell you cleanup doesn't look like its going to be much fun either!!

The vanity area. That mirror was really low... it was like in my chest. This use to be my granny's house and she was 4'11 and she put the mirror up so just she could look in it. Because I sure can't.

The toilet area. This was the beginning of my demo!

The inside of the shower. NASTY!! So happy to see it gone!

The back of the bathtub. See the big crack?!

Got all the tile ripped out of this part. Tedious process as I had to make sure I didn't bust any pipes!! We already had one water issue going on.

See the wire... Yeah was still struggling and really didn't see the end in sight!!

I was actually able to get this wall to come out in one piece, BUT because of the weight we had to break it down because we just couldn't carry it. It would take an army to move it!!
Friday, March 23, 2012
Sarah's Baby Shower
Good Morning Everyone ~
On this past Sunday, I decorated "A Star is Born" baby shower for Sarah and Wes! The party was thrown by Vibrations Dance Company and I had the pleasure of creating all the cute decorations!! We had the baby shower at a place that is very familiar to all of us... the dance studio!! Since we would be having the shower immediately after dance rehearsal, it only made sense to use this space! We used the "meeting room" and front waiting area for the bulk of the party! I told Sarah in the beginning that since she was having a girl... the party was going to be pink, Pink, and PINK!! And that's exactly what she received. "A Star is Born" theme was picked since the party was being thrown by her dance family and we would be inviting other friends who are part of the theatre community. It only seemed appropriate that we celebrate a STAR!!
Let me just say... that I was nervous that the games would not be "stimulating" enough! BUT to my surprise... everyone had a ton of fun playing all the games. I didn't know that grown men would take trying to guess a belly size so seriously! AND we actually had someone be SPOT ON for guessing the mommie-to-be belly size. The "big" game that was played was the funniest of all!! So everyone had to pick a partner... the object was to dress a naked baby (put on the diaper, shirt, and pants)... then put the baby in a shower go down the dance studio around a chair and back across the finish line! The catch though... one person had to be blindfolded and the other had to direct their partner on where the clothes, how to put them on, and get them down and around that chair without killing themselves. And in honor of March Madness... we had a bracket... we went through 4 rounds until we got to 1 winner. Congrats to Ashlee and Will for being the winners!! The whole thing was HILARIOUS!! I have never laughed so hard and actually was able to participate in this game. Who knew dressing a baby without your eyes closed could be so hard. We had babies that got thrown out of their stroller, diapers falling off, people almost running into the wall! There will be post on just this game with a video and photos, just so you can get the full impact of this game!!
On this past Sunday, I decorated "A Star is Born" baby shower for Sarah and Wes! The party was thrown by Vibrations Dance Company and I had the pleasure of creating all the cute decorations!! We had the baby shower at a place that is very familiar to all of us... the dance studio!! Since we would be having the shower immediately after dance rehearsal, it only made sense to use this space! We used the "meeting room" and front waiting area for the bulk of the party! I told Sarah in the beginning that since she was having a girl... the party was going to be pink, Pink, and PINK!! And that's exactly what she received. "A Star is Born" theme was picked since the party was being thrown by her dance family and we would be inviting other friends who are part of the theatre community. It only seemed appropriate that we celebrate a STAR!!
Let me just say... that I was nervous that the games would not be "stimulating" enough! BUT to my surprise... everyone had a ton of fun playing all the games. I didn't know that grown men would take trying to guess a belly size so seriously! AND we actually had someone be SPOT ON for guessing the mommie-to-be belly size. The "big" game that was played was the funniest of all!! So everyone had to pick a partner... the object was to dress a naked baby (put on the diaper, shirt, and pants)... then put the baby in a shower go down the dance studio around a chair and back across the finish line! The catch though... one person had to be blindfolded and the other had to direct their partner on where the clothes, how to put them on, and get them down and around that chair without killing themselves. And in honor of March Madness... we had a bracket... we went through 4 rounds until we got to 1 winner. Congrats to Ashlee and Will for being the winners!! The whole thing was HILARIOUS!! I have never laughed so hard and actually was able to participate in this game. Who knew dressing a baby without your eyes closed could be so hard. We had babies that got thrown out of their stroller, diapers falling off, people almost running into the wall! There will be post on just this game with a video and photos, just so you can get the full impact of this game!!
 |
| This area was used for the food. |
 |
| This was the welcome sign. I just love this picture! The mom liked the board so much she took it home! YEA! |
 |
| On the table are the shower favors. |
 |
| The mobile over the main table. Tissue tutorial here. |
 |
| Wider view of the main table. Draped fabric from ceiling to soften the feel of the room. Table without flowers on table. |
A bonus to the baby shower is... Wes the daddy-to-be made a video of the day and here it is!! Click the "here" to watch the video!
MORE PICS TO COME NEXT WEEK!!
MORE PICS TO COME NEXT WEEK!!
Thursday, March 22, 2012
Wine Bottle Arrangements
So I drink my fair share of wine and have friends who drink their fair share as well. So when I saw this project on Hostess with the Mostess I knew that I would be trying this out and knew I had to share this project!! DIY projects work for me!! Wine bottle arrangements are simple to make and inexpensive. Plus... someone has to empty the bottle and that may be the best part of the process!!


Materials Needed:
– 5 Green Wine Bottles... Clear bottles will work as well.
– Adhesive Remover... Goo Gone!
– 5 Wine Corks
– 18 Gauge Floral Wire
– Floral Pick
– 1" Sheer Green Ribbon
– Scissors
– Floral Knife or Floral Shears
– 5 Green Wine Bottles... Clear bottles will work as well.
– Adhesive Remover... Goo Gone!
– 5 Wine Corks
– 18 Gauge Floral Wire
– Floral Pick
– 1" Sheer Green Ribbon
– Scissors
– Floral Knife or Floral Shears
Step-by-Step Instructions:
1. First of all, enjoy that wine! Once those bottles are emptied soak them in hot water and scrub off the labels. You may need to use adhesive remover (Goo Gone) to get the more stubborn labels completely off.
1. First of all, enjoy that wine! Once those bottles are emptied soak them in hot water and scrub off the labels. You may need to use adhesive remover (Goo Gone) to get the more stubborn labels completely off.
2. Fill the wine bottles 3/4 of the way full with room temperature water. Mix in a little "flower food" to each bottle. This usually comes in a powder form in little packets with each bundle of flowers you purchase.
3. Choose your flowers. Make sure you have a variety of heights, textures, and bloom sizes to create interest within the arrangement. Keep in mind that the openings of the wine bottles are small so make sure the stems of the flowers you choose are not too big. There will be about 5 stems in each bottle.
4. As soon as you get your flowers, cut the stems at a deep angle with either your floral shears or floral knife to allow maximum hydration once they are inserted in the water.
5. Make your floral arrangements. The flowers are intended to look like they are spraying out of the wine bottles as if you just corked a bottle of champagne and BOOM the flowers started shooting out instead. Achieve this by staggering the heights of the stems, leaving enough space between each bloom, and angling the stems slightly outward.
6. Next take your floral pick and pre-poke a hole in each cork. Then insert your 18 gauge wire and place in your arrangement so that it looks as if it is shooting out of the bottle along with the flowers.
7. Wrap each wine bottle in your choice of ribbon by using this "wrap & twist" technique: Cut 4' lengths of ribbon. From behind each bottle take the center point of the ribbon and wrap the bottle once around. When the ends meet in the front of the bottle twist and wrap around the bottle again only twisting in the front. Repeat this step up the whole base of the bottle. Knot and trim the ends of the ribbon on the backside.
8. Cluster your group of wine bottle arrangements in the center of your dining table at a wine and cheese party or use them as decor on your food display table. The great thing about these arrangements is that each guest can take one home easily at the end of the night.


All photos from the blog Hostess with the Mostess
Tuesday, March 20, 2012
You Don't Just Have To Drink Out of Them
WINE GLASSES... You can do more than just drink out of them!! If you find yourself with a mismatched collection―or without bubbly―flip thick-walled glasses upside down to create a beautiful grouping of candle stands for a shelf or a mantel. Use heavy wineglasses for table centerpieces, as the wider mouths will provide more stability to withstand bumping.
I know MANY (and you know who you are, including myself) friends that have various types of wine glasses and all we do is drink out of them! Nothing wrong with that... BUT... wine glasses are beautiful to use as decoration. And because you may have mismatched glasses, the varying heights and shapes make an interesting tablescape. You can also use wine bottles as candle holders. I did a post last week on how to cut glass using household items and this would be a great project to work on.


I know MANY (and you know who you are, including myself) friends that have various types of wine glasses and all we do is drink out of them! Nothing wrong with that... BUT... wine glasses are beautiful to use as decoration. And because you may have mismatched glasses, the varying heights and shapes make an interesting tablescape. You can also use wine bottles as candle holders. I did a post last week on how to cut glass using household items and this would be a great project to work on.


Monday, March 19, 2012
How To Make Inexpensive Favors
So for the baby shower this past Sunday, we had a limited budget, so doing DIY projects and finding items on sale was a MUST! Creating these party favors was not only fun, but friendly to the budget!!


 |
| Here are the labels before I hot glued them on the bag. They were layered. I used a craft bunch to cut out the labels, which made them the perfect shape and size every time. I used large 12 x 12 sheets of paper to cut out the labels. The sheets of paper were on sale for 16 cents!! I got extra sheets for future projects. Just could no pass up that price! Craft punches are a great little investment! They come in numerous shapes and sizes and at Michael's and Hobby Lobby they are usually on sale and both stores offer 40% coupons, so getting some of those is a MUST! For what I used inside... chocolate of course. What woman doesn't love chocolate! |
 |
| So these bags I got from the DOLLAR STORE! They came in a pack of 12 and all I had to do is put them together and that was pretty simple. I actually put them together one night before dance rehearsal, while sitting on the floor talking to friends. |
 |
| On the inside of the bags I put a little of the plastic grass! It's around Easter and got the grass for 1.33 a pack. I got two packs, but really only needed 1. Those packs were able to pill up my bags, but have a TON left over! If have green in your color scheme... the green grass was only 33 cents! |
 |
| The inside of the bags with the candy inside. Just so you know... You can't put too much candy inside of these and it close correctly. :-( |


And here are the bags completed! I decided to use black ribbon because more pink would of been too much!! So in total to make this treat it cost roughly 25 cents per bag!! Can't beat that!!
Saturday, March 10, 2012
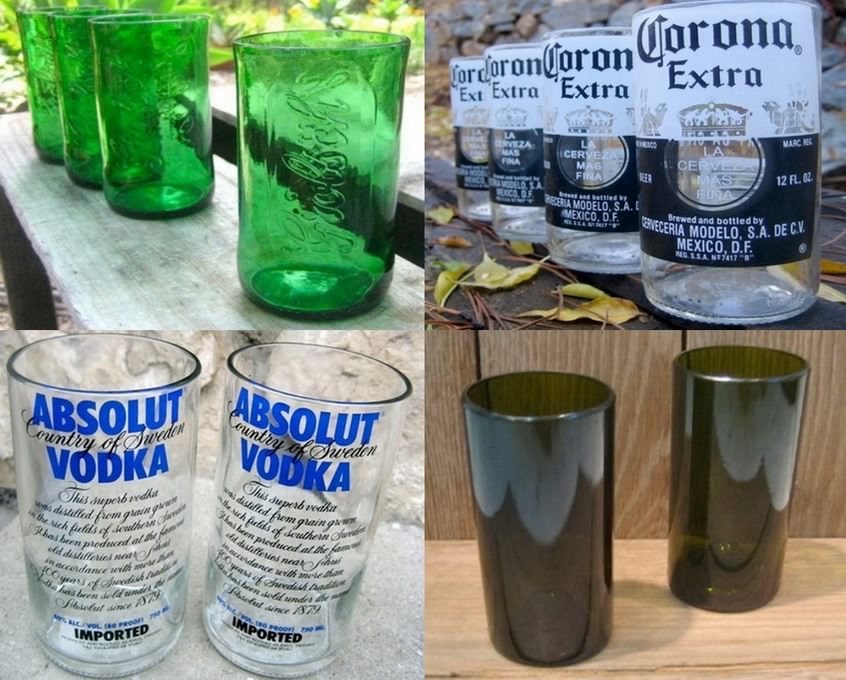
Cutting Glass
So I experimented today with trying to cut glass... specifically a wine bottle! Let's just say it didn't go quite like the directions said. Here are the directions on how to cut a bottle.
Sorry I don't have a pic of the blanched attempt to cut the bottle. It really did work, I just think I let the flame burn for too long and the bottle cracked around the rim. That was my second attempt at trying to cut the bottle. I tried 3 times and then started to make the house stink. So I will make another attempt in a few days and not let the flame burn for as long. But I promise to myself that I am going to get this to work as I have some get ideas for what I work like to do with the glass!

How to make glass from a glass bottle: wrap a piece of cotton string 5-6 times around the item you want to cut and tie it. Slide it off and soak it in acetone. YES... the stuff that takes your nail polish off! Place the string back on the bottle where you want the break to happen. Be near water, just in case! Ignite it. Yes it will flame up. Let it die down. After that, the place where the cord, immediately under cold water. Smooth the edges with sandpaper. If you don't get it the first time, don't despair. Just drink a lot of wine so you have extra bottle to practice on. I wouldn't recommend drinking and doing this project though!
Wednesday, March 7, 2012
Cupcake Toppers
So it just donned on me yesterday that the baby shower I am helping to plan happens NEXT SUNDAY.... Yikes!! No sweat... I am on top of things and actually function a little better under a time crunch. Well I was back on my PINTEREST hunt today and found some more FABULOUS ideas on games and whatnot. The best thing I stumbled upon... I AM GOING TO MAKE THE CUPCAKE TOPPERS! I am so excited and want to run out to Michael's right now. Oh yeah about Michael's... we just got a new one in Columbia and it is GREAT!! I took my boyfriend with me (big mistake) and he practically had to drag me out because I just kept walking in circles and finding more things that I wanted to purchase and crafts I wanted to do. Plus how can you NOT LOVE Michael's when you can almost always get things at 40-50% OFF! #winning So here is a pic of the cupcake toppers that I will be attempting to make this weekend!! Definitely come back on Sunday for a tutorial on how to make these!!


Thursday, March 1, 2012
Will You Be My Bridesmaid?
I am ALWAYS browsing on Etsy looking for various creations, especially earrings and bridal/party items. I get a ton of ideas from just looking at what vendors have to offer. I am just in AWE over some of the items that see on this site. Well during my hunt one day, I came across "Will You Be My Bridesmaid" cards. I think this is the cutest idea and adds a special touch to asking someone to share your special day with you!! These cards can be personalized to state what their role will be in the wedding... maid of honor, junior bridesmaid, matron of honor, etc and come in a variety of colors and shapes. Here are a few that I really liked:


These are really cute.

I thought this card was funny!! And hopefully BRIDES you will pick out a dress that does look fabulous and your ladies want to wear again, so you don't have to make them feel guilty!!

I really like this card. You have to have your girls around to celebrate your day!!

I love the layers on this card. The dress is actually a 2-D shape and not just flat on the paper.

Mad Lib Card - This card is simple to make.
1. Create card using Microsoft Office or PowerPoint. It should only be a half page card. And I would hand write in the answers or use a different font than the other words. Once you print out the card.
2. Use colored card stock paper and cut it to be slightly larger than your card.
3. Use a little glue to seal the two together and POOF you have your card!!
On a budget? Most of these cards are really easy to make. You just have to have a little time, patience, and good paper!! Good paper can make a world of difference!
Subscribe to:
Posts (Atom)